Yes, I said it, chocolate, coconut, halibut. And why not?
We eat shrimp crusted in coconut, we eat chocolate in savory mole sauces? And did you know that chocolate and coconut are both good for you (in moderation of course)?
The kernel of this idea was bouncing around in my brain for a little bit, my wife had been talking about coconut a lot, and then at a nice restaurant we had this trout server with white chocolate and raspberries (and it was really good), so I was getting the inkling of the idea to give some fish the chocolate treatment, in the end I just sort of winged it.
We love eating halibut, we can’t find it locally so I have to buy it over the Internet. But I guess that is why Darwin invented freezers. Halibut is a wonderful fish that is not very fishy, is thick and meaty like swordfish, but doesn’t come with all the mercury. The largest of the flat fish, it is sustainably caught in Alaskan waters (wild caught Alaskan fish is more or less the best you can buy, of any fish species that can be found in Alaska). The halibut cheek in particular is a prized piece of fish flesh that I hear is Alton Brown’s favorite bit of seafood. So I order it in bulk, and rotate it in with the trout and salmon we otherwise eat. Yes it is frozen, yes I don’t care. Most fish is frozen, even the stuff you buy that you think is fresh was frozen at one point, because most fish is frozen on the boat right after being caught, and how else are you supposed to get Alaskan fish without moving to Anchorage?
So I cook it a lot, but I like to try new things. So, here is what I did. First I thawed out my fillets in the fridge overnight, they already kindly had the skin removed by the processor. Then I dried them off good, salted them, and tossed them in a mixture of cocoa powder and corn starch. Why? Well, the cocoa powder for the flavor, and the corn starch because I wasn’t sure how cocoa powder would behave when fried. See, when frying you want to coat in a starch because starches, when heated, sort of explode and thicken and so the properties that make them good as a thickener for soups and gravies, also make them a good coating for frying food. I also added in a tablespoon or so of McCormick Caribbean Jerk seasoning, which is one of my go-to favorite seasoning blends. In the back of my mind I was thinking “mole sauce” so I knew it needed a little spice.
Then it went into an egg wash and into shredded coconut. Oh yes, you recognize it now, this thing is bound for the deep fryer baby!
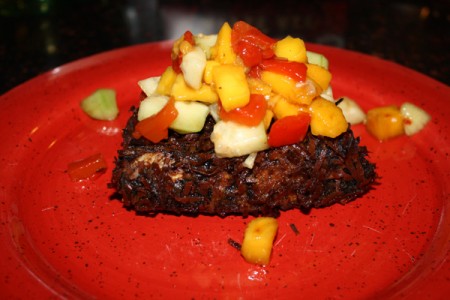
Chocolate coconut halibut, topped with mango salsa.
3-5 minutes, until its floating brown, you have to look a little carefully, because the cocoa powder makes it extra dark.
The verdict? It worked, everyone liked it. I served it with a mango salsa (mango, cucumbers, roasted red peppers, salt, sugar, basalmic). I took a fish from the cold Alaskan waters and gave it an island makeover.
Yes it was deep fried, though in olive oil, but we’ve still got a heart healthy fish, covered in cocoa powder (which is very healthy for you… the powder, very nutritive, as opposed to a candy bar high in fat and sugar), and coconut, which, while not being low in calorie, is also nutrition dense and very low in bad fats and high in good fats.
My wife has been reading about the Paleo diet for awhile, and I also wanted to make this for her, because I figure it probably qualifies as a Paleo dinner. It is certainly a nice change from perhaps beer battered fish dipped in tartar sauce.


Recent Comments